Software agent for streaming from an IP camera without a static IP
We built a small program that can be installed on an ordinary computer, a mini PC next to the camera or a virtual machine inside your network. The agent receives the RTSP stream and sends it to rtsp.me on its own.
Builds are available for Windows, Linux and ARM. The agent is provided free of charge.
Go to installationHow to connect an IP camera without a static IP
With an ordinary RTSP connection the server must be able to reach the IP camera over the internet. That usually requires a public IP address and port mapping on the router.
The rtsp.me agent works the other way round. It normally sits in the same local network as the camera: it picks up the camera's RTSP stream at its local address and sends the video to the rtsp.me server itself over an outbound RTMP connection.
So the camera can be connected even with a dynamic IP, CGNAT or mobile internet, without exposing the camera's RTSP port to the internet.
Advantages of the agent
- No static IPThe agent establishes the outbound connection itself
- No open portsPort mapping and external access to the camera are not required
- Closed networkInbound connections from outside can stay blocked
- Camera credentials stay localThe RTSP link, login and password are never sent to rtsp.me
- Windows, Linux and ARMUse a PC, VPS, server or a compact mini PC
- FreeInstalling and using the agent costs nothing
How the agent differs from a camera's RTMP Push
If your IP camera supports RTMP Push on its own, the agent is not needed — the rtsp.me RTMP link can be entered directly in the camera settings.
The agent is intended first of all for ordinary RTSP cameras that cannot send a stream over RTMP by themselves. It receives the camera's RTSP stream inside the local network and performs the RTMP Push to rtsp.me.
Installing the agent for an IP camera on Windows
- Download the agent installer for Windows.
- Run the installer.
- Follow the standard steps of the setup wizard.
- When the installation finishes, open the agent's web interface.
Installing the agent for an IP camera on Linux and ARM
Download the archive for your computer's architecture:
- Linux AMD64 — ordinary computers and mini PCs with a 64-bit Intel or AMD processor;
- Linux ARM64 — 64-bit ARM devices;
- Linux ARMv7 — 32-bit ARM devices.
Unpack the downloaded archive and run the installer:
tar -xzf rtspme_<version>_linux_<arch>.tar.gz
cd rtspme_<version>_linux_<arch>
sudo ./install.sh
If needed, you can change the web interface port or allow access to it from the local network:
sudo ./install.sh --port 9000
sudo ./install.sh --bind lan
Removing the agent:
sudo ./install.sh --uninstall
sudo ./install.sh --uninstall --purge
The --purge option removes the agent together with its settings.
Get the RTMP link
Before configuring the agent, prepare your personal publishing link:
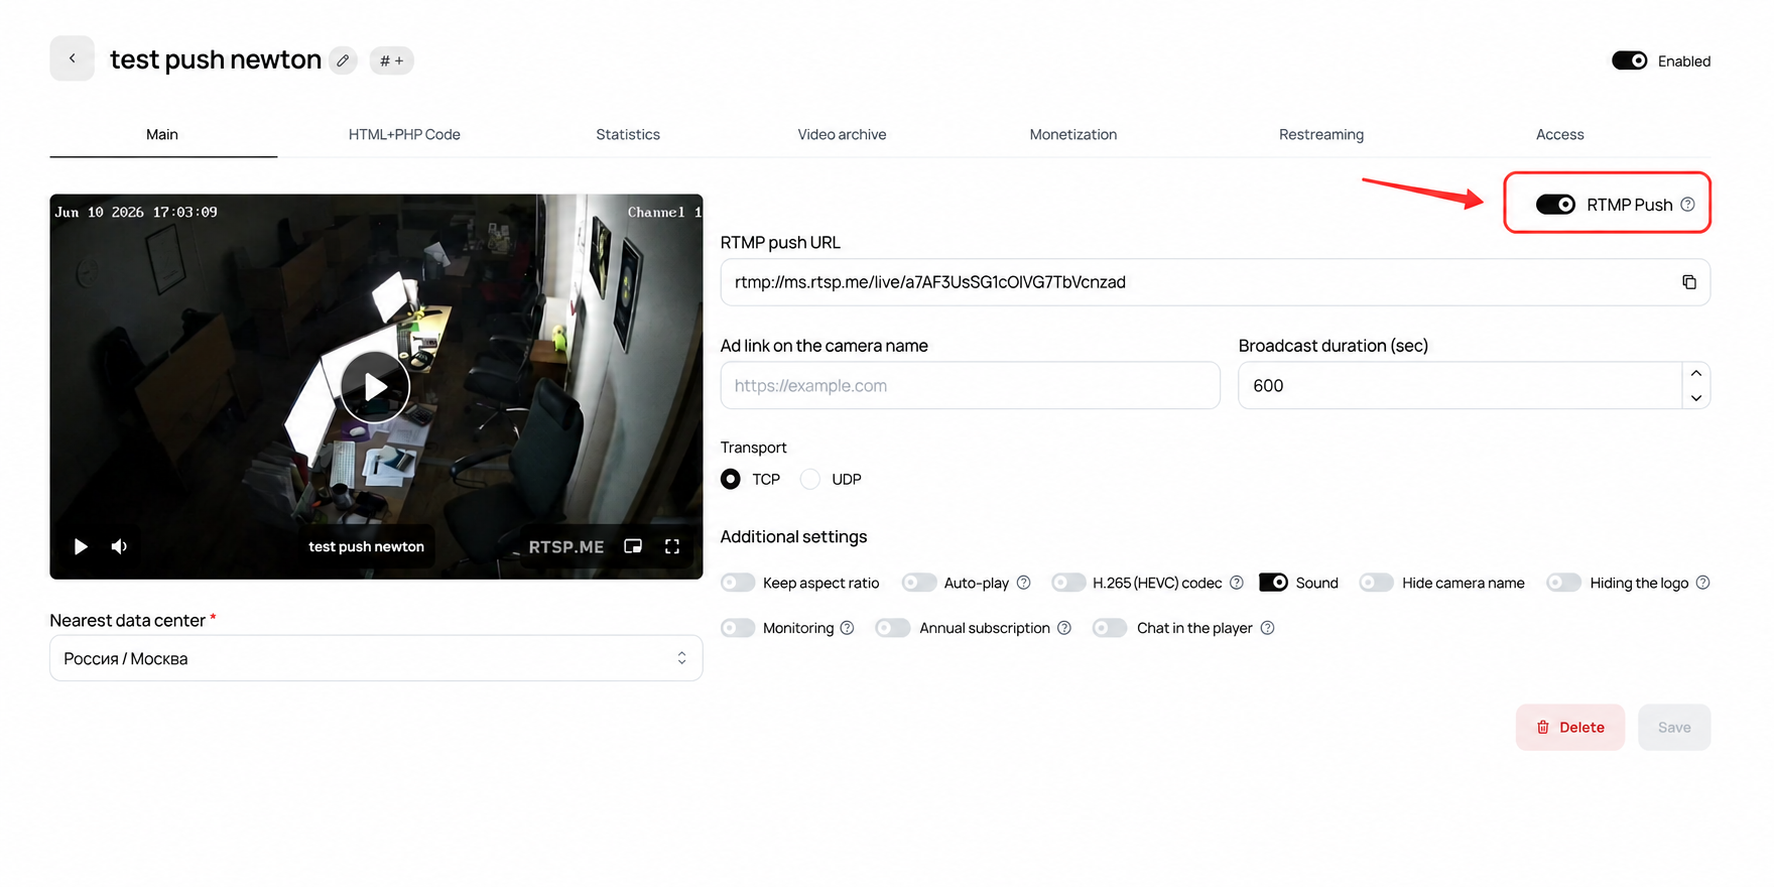
- Log in to your rtsp.me account.
- Create a new camera or open the settings of an existing one.
- Switch the RTMP Push toggle on.
- Copy the RTMP link that appears, in full.
First sign-in
All administration of the agent is done through its web interface. On the computer where the agent is installed, open:
On first sign-in, create a password for accessing the agent. Use a separate strong password and store it in a password manager.
Add a stream
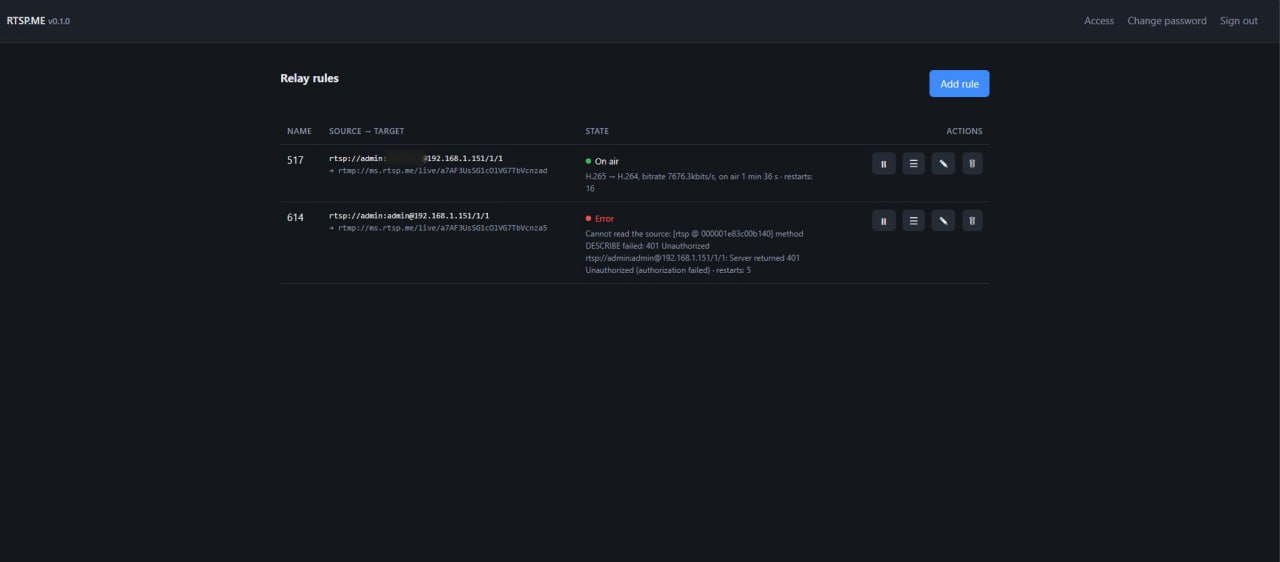
After creating the password, the administration panel opens:
- Click the button for adding a new stream.
- Choose a clear name for the stream.
- Paste the camera's local RTSP link.
- Paste the RTMP link you copied earlier from your rtsp.me account.
- Save the settings and start the stream.
Make sure the computer running the agent can see the camera at its local address and has a stable internet connection.
You can create as many streams as you like through the agent — the number of streams is limited only by your computer's resources and the bandwidth of your connection.
Done — the camera is streaming
Go back to your rtsp.me account. If everything is set up correctly, the camera is already streaming — live video appears in the camera list.
All that's left is to embed the player iframe on your website — the embed code is available in the camera settings.
Codec and transcoding
For streaming, we recommend setting the camera to the H.264 codec. It needs no extra transcoding and puts less load on the computer running the agent. See also the recommended IP camera settings.
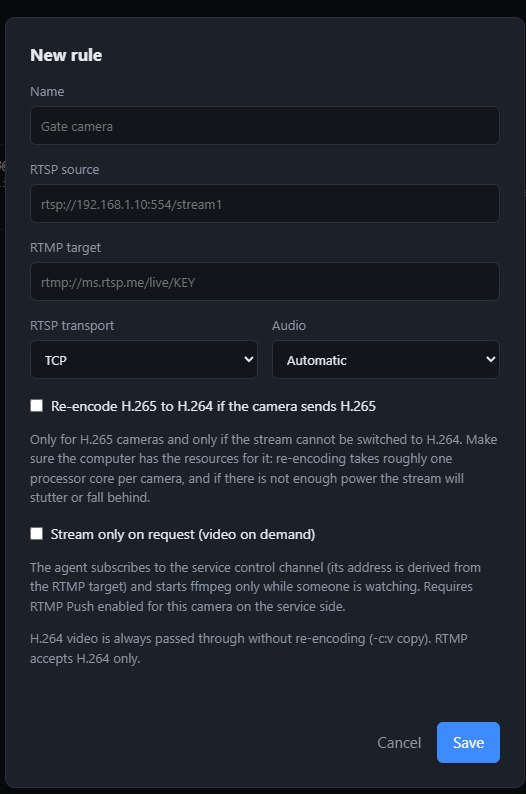
If the camera outputs only H.265, the agent can transcode the stream to H.264 locally. Keep in mind that transcoding consumes CPU resources. The load depends on the resolution, frame rate and the number of simultaneous streams.
Starting an RTSP stream on demand
If the site uses mobile internet or a plan with a traffic cap, enable on-demand stream start.
In this mode the agent sends video only when the stream has active viewers. The first start takes a little longer, but no outbound traffic is used while there are no viewers.
Pricing
The agent itself is distributed free of charge — installing and using it costs nothing.
You only pay for the number of views of our player, according to the rtsp.me tariffs.
Frequently asked questions
Connect your local camera
Create a camera on rtsp.me, switch RTMP Push on and add the link you receive to the agent.
Open rtsp.me