How to set up port mapping for an IP camera
Port mapping, port forwarding, “virtual server” and “port redirection” are different names for the same setting. It directs a request from an external port on the router to the RTSP port of a camera on the local network.
Once it is set up, the rtsp.me server will be able to fetch the camera’s video stream at the public address.
Check an RTSP link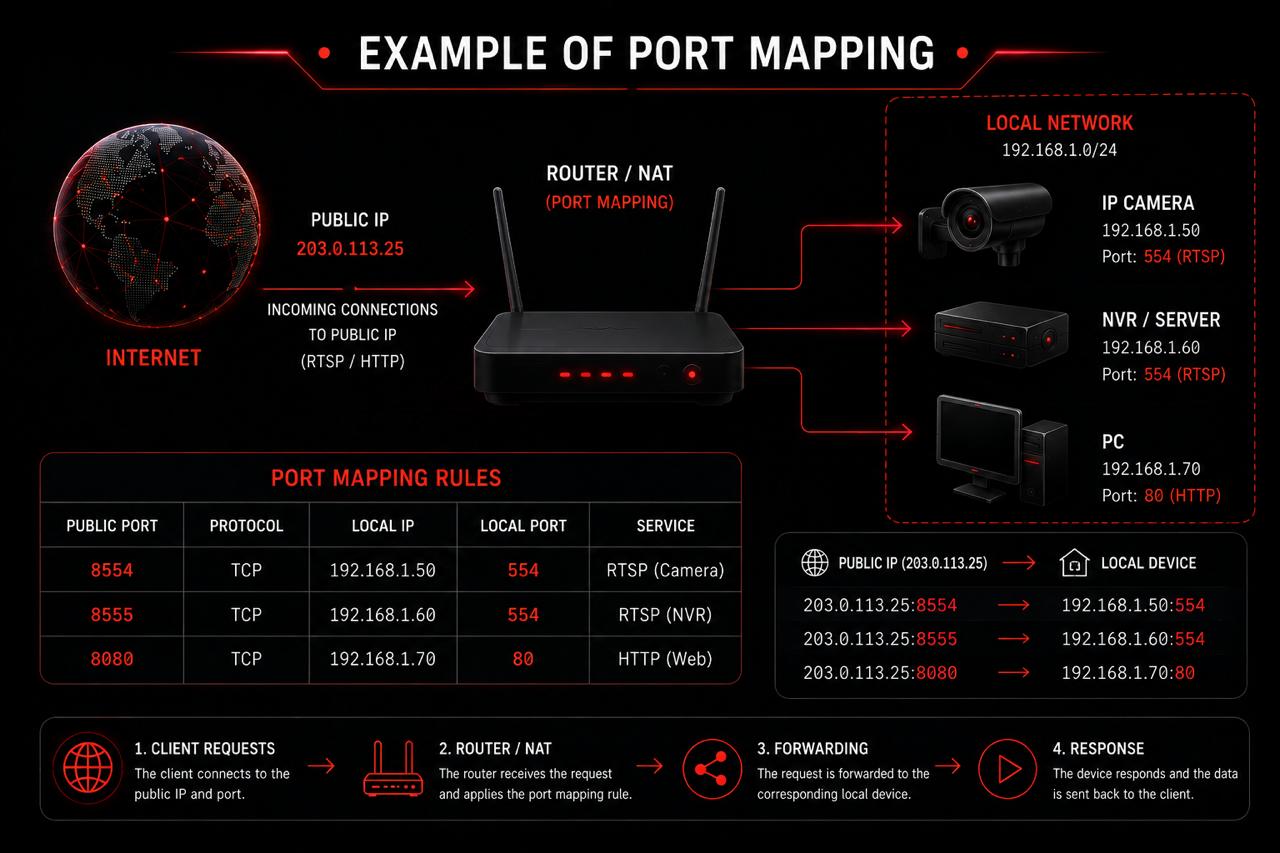
How port forwarding works
Suppose the camera has the local address 192.168.1.100 and accepts RTSP on port 554. On the router you can open external TCP port 10554 and direct it to the camera:
The public RTSP link uses the router’s external IP or DDNS name together with the external port:
The /stream-path depends on the camera manufacturer. Examples are given on the page “Where to find your camera's RTSP link”.
Before you start
Gather the camera details and make sure a direct connection is possible.
- Check your public IP. The router’s WAN address must be public. If it falls within the ranges 10.0.0.0/8, 172.16.0.0/12, 192.168.0.0/16 or 100.64.0.0/10, your ISP is probably using NAT or CGNAT.
- Find the camera’s local IP. For example, 192.168.1.100.
- Fix the camera’s address. Create a DHCP reservation against its MAC address so the rule does not stop working after a reboot.
- Check the RTSP port. Port 554 is commonly used, but the camera may be set to a different one.
- Test RTSP locally. Make sure the camera delivers a stream inside the network before you change anything on the router.
Fields in the rule
The names differ, but almost every router asks for the same values:
- NameFor example, RTSP Camera
- ProtocolTCP; if only a combined mode is available, choose TCP/UDP
- External portFor example, 10554
- Internal IPFor example, 192.168.1.100
- Internal portThe camera’s RTSP port, for example 554
- SourceAny, unless rtsp.me has supplied addresses to restrict it to
Save the rule and enable it. Do not create a port range if you only need one RTSP port.
Keenetic
- Open the router’s web interface, usually my.keenetic.net or its local IP.
- In the home devices section, select the camera and register a permanent IP address for it.
- Open Network rules → Forwarding.
- Create a rule for the “Provider” inbound interface, protocol TCP and external port 10554.
- Choose the camera as the destination device and set the internal port to 554.
- Save the rule and make sure it is enabled.
Depending on the KeeneticOS version, the section may be labelled “Forwarding” or “Port forwarding”.
TP-Link
- Open tplinkwifi.net or the router’s local address.
- Fix the camera’s IP in Advanced → Network → DHCP Server → Address Reservation.
- Go to Advanced → NAT Forwarding → Virtual Servers.
- Add a rule: External Port — 10554, Internal IP — the camera’s address, Internal Port — 554, Protocol — TCP.
- Enable the rule and save the settings.
In the older interface the section may be called Forwarding → Virtual Servers.
ASUS
- Open router.asus.com or the router’s local address.
- Fix the camera’s address: LAN → DHCP Server → manual IP assignment.
- Go to WAN → Virtual Server / Port Forwarding.
- Enable Port Forwarding and add an RTSP Camera profile.
- Set External Port 10554, the camera’s Internal IP, Internal Port 554 and Protocol TCP.
- Apply the settings.
MikroTik
In RouterOS the rule is created under IP → Firewall → NAT. You will need administrator rights and an understanding of which interface is the inbound WAN.
- Add a rule with Chain dstnat, Protocol tcp, Dst. Port 10554 and the inbound WAN interface.
- On the Action tab, choose dst-nat.
- Set To Addresses to 192.168.1.100 and To Ports to 554.
- Make sure the Firewall Filter rules allow this forwarded connection.
Do not paste the command without first checking the WAN interface name, the local subnet and your current firewall policy.
Huawei and ZTE
Routers and ONTs from these manufacturers are often supplied by the ISP. The menu items available and your user rights depend on the model and the operator’s settings.
- Open the device’s local address, given on its label or in the ISP’s instructions.
- Find the Forward Rules, NAT, Port Mapping or Virtual Server section.
- Select the WAN connection that has internet access.
- Set the external port to 10554, the camera’s internal IP, internal port 554 and protocol TCP.
- Save and activate the rule.
If the section is hidden or the settings are unavailable, contact your ISP. Do not use service passwords found on the internet.
Xiaomi and Redmi
- Open miwifi.com or the router’s local address.
- Fix the camera’s local IP, if the firmware offers DHCP reservation or a static IP.
- Find Advanced → Port Forwarding or Port Mapping.
- Create a TCP rule: external port 10554, the camera’s IP, internal port 554.
- Save the rule.
The set of features differs between official and regional firmware. If port forwarding is not available, use a different router or an alternative way of connecting the camera.
Checking the setup
- Insert the public IP or DDNS name and the external port into the RTSP link.
- Open rtsp.me, paste the link and click “Test”.
- Wait for the result: the check is performed remotely by the rtsp.me server.
If there is no connection, compare the router’s WAN address with your public address and check the camera’s IP, the ports and the protocol. Make sure the rule is enabled and is not tied to the wrong WAN interface.
Security
- Do not put the camera in the DMZ: that exposes more services than you need.
- Do not open the camera’s web interface unless you have to.
- Update the firmware on both the router and the camera.
- Create a separate camera user with the minimum rights required.
- Use a strong, unique password and do not publish the RTSP link.
- Open only the one external port you actually need.
If your security rules prohibit inbound connections, use MyVMS Bridge or RTMP Push instead of opening a port.
Frequently asked questions
Test your RTSP port forwarding
Build an RTSP link using the public IP or DDNS name and the external port. The remote rtsp.me check will show whether the video stream is reachable.
Check an RTSP link