Our equipment for setting up a stream
If you would rather not set up a public IP address and port forwarding, use our ready-to-use equipment to connect to rtsp.me.
For a new location, a cloud IP camera is the answer. For cameras that are already installed, use the MyVMS Bridge, which connects up to eight devices on the local network to the service.
Connect the equipmentTwo ways to connect
- Ready-to-use cameraConnect the device to the internet and enter the details from the card
- MyVMS BridgeConnect up to 8 of your existing IP cameras to rtsp.me
- No public IPA static public IP address is not required
- No port mappingThere is no need to open the camera's RTSP port on the router
Both options establish an outbound connection from the local network. That makes them easier to get running at sites with a dynamic address or CGNAT.
MyVMS 5Mp Bullet Surveillance Camera
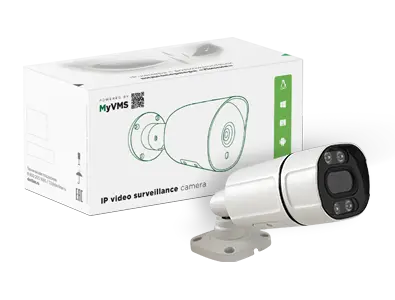
99 Euro
Buy the cameraA ready-to-use bullet IP camera for cloud streaming through rtsp.me. No need for a static IP address or port mapping — the connection method is already built in.
- Resolution2592 × 1944 pixels, 5 Mp
- Frame rateUp to 25 frames per second
- Lens2.8 mm with a wide viewing angle
- HousingCylindrical metal body rated IP-65
- MountingMounting kit included
- NetworkWorks without a static IP or port forwarding
How to connect the ready-to-use camera
Nothing extra needs configuring on the camera itself. Connect it to your local network with internet access, then add the device details on the website.
- Install the camera where you want it, with a suitable view.
- Connect power and the network cable as described in the supplied instructions.
- Make sure the local network has internet access.
- Find the paper card inside the box.
- Open rtsp.me and add a new camera.
- Enter the login, password and camera ID from the card.
- Check that the picture appears in your account.
Example camera link
The details on the card make up the RTSP link. The following shows the structure only:
- admin — an example login;
- dBZp5bOcEtaGP11_ — an example password;
- 447cq4tq4jkzpza4 — an example camera ID;
- /ch01_sub.264 — the path to the sub stream.
Use the actual values from your own camera's card. Do not copy the demonstration details into a working connection.
MyVMS Bridge
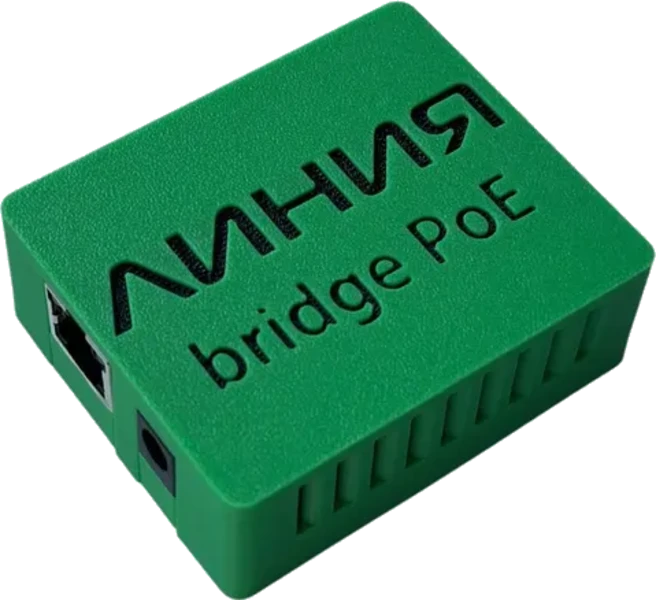
50 Euro
Buy the BridgeA device for connecting existing IP cameras to rtsp.me without a public IP address and without opening inbound ports on the router. Simply install it in your local network, and our technical support will set up the streaming for you.
- Up to 8 camerasOne device serves several IP cameras
- Any manufacturerConnects compatible cameras over local RTSP
- No public IPWorks on dynamic-address and CGNAT networks
- No port mappingCamera RTSP ports stay closed to the internet
- Local networkThe Bridge reaches cameras at their internal IP addresses
- Support includedrtsp.me specialists configure the streaming
How to connect the Bridge
- Install the MyVMS Bridge on the same local network as your IP cameras.
- Connect the device to power and the network as described in the supplied instructions.
- Make sure the Bridge and the cameras are reachable within the local network.
- Fix the cameras' local IP addresses using DHCP reservations.
- Have the cameras' logins, passwords and RTSP paths to hand.
- Find the Bridge ID on the paper card inside the box.
- Contact rtsp.me technical support to set up the streams.
Once set up, the cameras can be viewed through rtsp.me and placed on your website using the ready-made HTML player.
Example link through the Bridge
In the link, the local IP address of the camera you want follows the Bridge ID, separated by a hyphen. The login and password belong to that local camera.
- admin — an example login for the local IP camera;
- dBZp5bOcEtaGP11_ — an example password for the local IP camera;
- 447cq4tq4jkzpza4 — an example Bridge ID;
- 192.168.1.100 — the camera's local IP address after the hyphen;
- /ch01_sub.264 — an example path to its RTSP stream.
Each of the eight cameras uses its own local IP, login, password and stream path. Technical support will give you the exact connection format.
Camera or Bridge
| Requirement | Ready-to-use IP camera | MyVMS Bridge |
|---|---|---|
| A new viewpoint | Suitable | A separate camera is needed |
| Cameras already installed | Not needed | Suitable |
| Number of cameras | One | Up to eight |
| Static public IP | Not needed | Not needed |
| Port mapping | Not needed | Not needed |
| Initial setup | Connect to the network and enter the details | Install on the network and configure with support |
Once you are connected
The equipment solves the problem of getting the video stream to rtsp.me. Once the camera appears in your account, the usual features of the service are available:
- watching the stream in a browser on a computer or smartphone;
- getting the player's HTML code for your website;
- access to visitor statistics;
- restricting viewing by domain, password or sign-in;
- adding a cloud video archive;
- bringing cameras from different sites together in one account.
Embedding the player is covered in more detail on the “How to embed a stream on your website” page, and recording in the “Cloud video surveillance from IP cameras” guide.
Keeping the connection secure
- keep the card with the ID, login and password somewhere secure;
- do not publish the full RTSP link where anyone can see it;
- fix the local IP addresses of cameras connected through the Bridge;
- do not enable DMZ and do not expose camera web interfaces unnecessarily;
- grant support remote access only by an agreed method;
- change the passwords on local cameras if you suspect the details have been exposed.
Frequently asked questions
Choose the right equipment for your site
Use the ready-to-use cloud IP camera for a new location, or the MyVMS Bridge for the cameras you already have.
Get in touch with rtsp.me